

Three keywords, three completely different combat problems. Here's exactly what each one does and how to actually play around them.
Fusion World's combat keywords aren't one unified mechanic — Critical, Barrier, and Blocker each solve a genuinely different problem at the table, and confusing them leads to real in-game mistakes. Two of them (Barrier and Blocker) are defensive; Critical is an offensive keyword that lives on attackers and punishes the defender — which is exactly why they're so easy to mix up. Critical changes what happens when damage connects. Barrier stops your opponent's skills from choosing the card at all. Blocker changes who an attack actually targets.
Understanding each keyword individually — and knowing which of your own decisions each one actually affects — is the difference between playing around your opponent's defenses effectively and getting blindsided by a keyword you half-understood.
This guide breaks down all three keywords precisely, plus the practical sequencing adjustments each one demands.
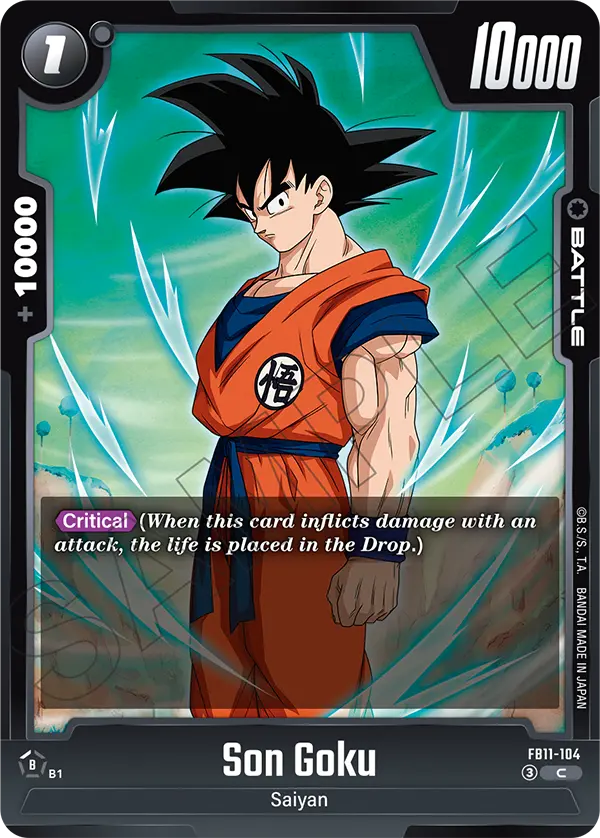
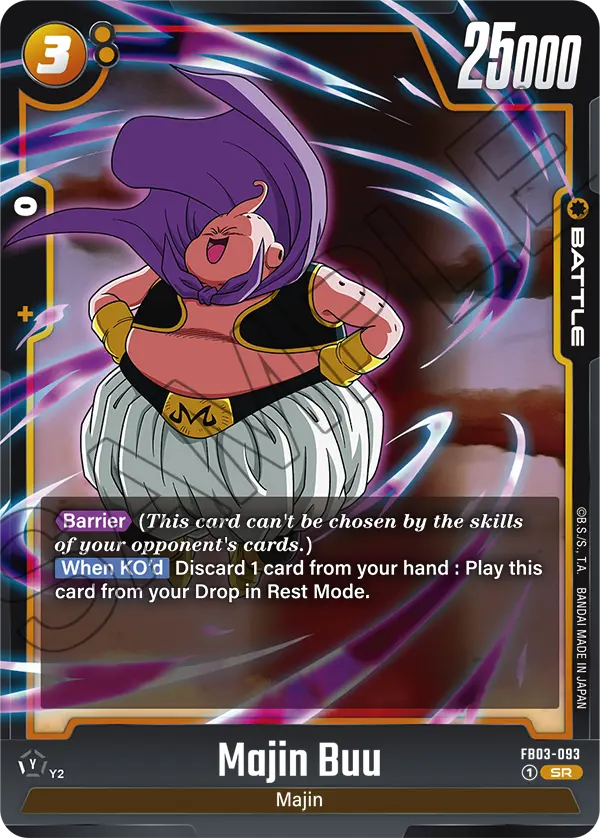
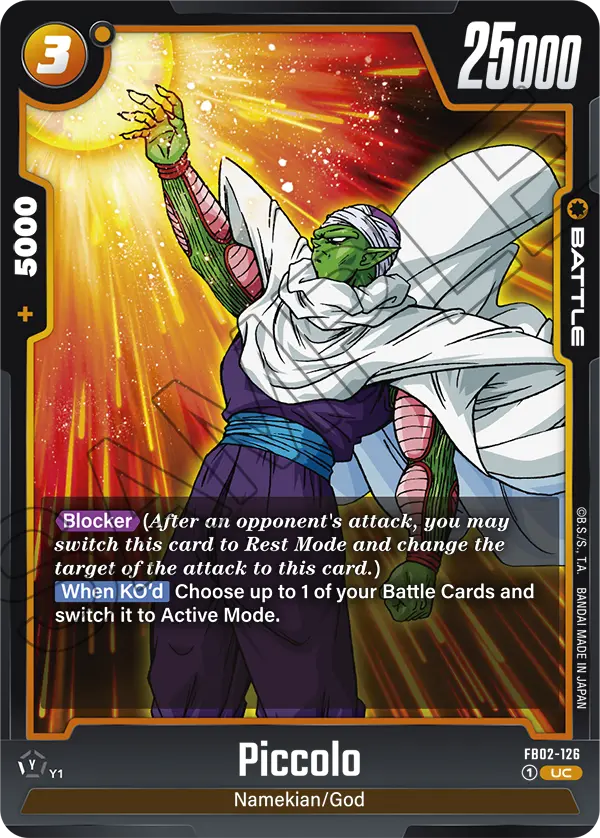
→ Short Version
Critical changes what happens on damage: when a Critical attack connects, the opponent's Life card goes to the Drop Area instead of being drawn into their hand — denying the card-advantage trigger a normal hit provides. Barrier stops your opponent's skills from choosing the card: the printed reminder text reads "This card can't be chosen by the skills of your opponent's cards," so single-target removal, board-wide sweepers, and any other opposing skill that has to choose a card all fail against it. What still gets through is combat — a Barrier card can lose a battle like anything else — and the rare opposing skill that resolves without choosing a card. Blocker changes the attack's target: resting a Blocker card lets you redirect an incoming attack onto it instead of its original target. All three require different sequencing responses — playing around one doesn't automatically play around the others.
→ Related Reading
- The Combo System Explained
- Closing Games vs Control in Fusion World
- Beating Aggro in Fusion World: Anti-Red Tech
- How to Play Dragon Ball Super: Fusion World
In This Guide
| Keyword | What It Does | When It Triggers | What Beats It |
|---|---|---|---|
| Critical | Life card → Drop Area (not hand) | When the Critical attack connects | Blocker (absorb the attack); remove the attacker |
| Barrier | Opponent's skills can't choose it | Any time an opposing skill tries to choose it | Combat damage; skills that don't choose |
| Blocker | Redirects attack to itself (rests) | When opponent declares an attack | Overwhelm it; bait with small attacks first |
Interaction Matrix
How the three keywords interact when multiple are on the same board.
| Scenario | Outcome |
|---|---|
| Critical attack → Blocked by Blocker | Critical is negated — attack hits Blocker, not Life area |
| Any opposing skill that chooses → Barrier card | Skill can't touch it — single-target and "choose all" alike |
| Barrier card attacks into a bigger blocker | Barrier card is KO'd — Barrier stops skills, not combat |
| Blocker already rested → second attack declared | Can't block — Blocker must rest to activate, already tapped |
| Barrier + Blocker on same card | Can block attacks AND dodge targeted skills — strong defensive piece |
Critical: Denying the Life Draw
Normally, taking battle damage in Fusion World means drawing your top Life card into your hand — a built-in card-advantage cushion that softens the impact of getting hit. Critical changes that outcome specifically: when an attack with Critical connects, the defending player's Life card goes to the Drop Area instead of being drawn. If a Critical attack deals two or more damage, that many Life cards are placed in the Drop Area — so a high-power Critical hit can deny multiple Life draws at once.
This matters more than it might first appear. Life cards drawn into hand are a genuine resource — sometimes exactly the answer a player needs at the moment they need it. A Critical attack denies that resource entirely on top of the damage itself, which makes Critical attackers meaningfully more punishing to take a hit from than an equivalent non-Critical attacker — and several Critical Leaders hit above the usual power thresholds even before awakening.
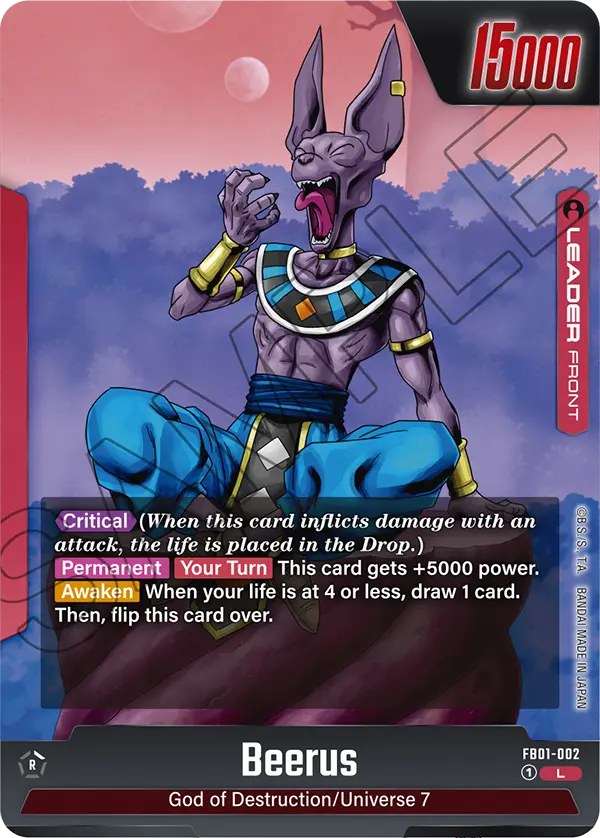
Playing around Critical means treating an unanswered Critical attacker as a bigger problem than its raw stats alone suggest — the card-denial effect compounds with every hit that connects, and a board with multiple Critical attackers can starve you of Life-area resources fast.
From the attacking side, sequencing your Critical attacks correctly is just as important as having them on board. If your opponent has a Blocker available, leading with your Critical attacker lets them absorb it with the Blocker and deny you the Life-area punishment entirely. Instead, bait the Blocker with a smaller, less impactful attack first, then follow up with Critical once the defensive option is exhausted. This attack-ordering discipline is one of the clearest skill separators at competitive tables — newer players swing with their biggest threat first out of instinct, while experienced players sequence specifically to ensure Critical connects where it hurts most.
Barrier: Can't Be Chosen
Barrier's printed reminder text is short, and it is broader than it often gets played: "This card can't be chosen by the skills of your opponent's cards." That is the whole rule. It makes no distinction between kinds of removal — if an opponent's skill has to choose a card in order to resolve, it simply cannot choose the Barrier card. Single-target KO effects, targeted power reduction, bounce-to-hand, and board-wide "choose all cards in the Battle Area" sweepers all pass over it for exactly the same reason.
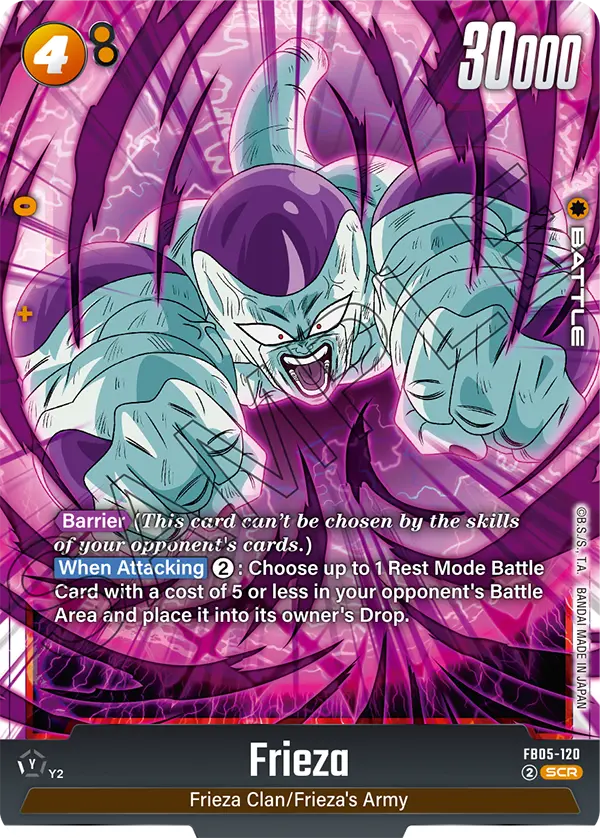
Both Barrier cards pictured in this guide carry that identical wording — Majin Buu (FB03-093) and Frieza (FB05-120) — and the official card Q&A for Majin Buu makes the breadth explicit: it confirms that Buu is not KO'd by an opposing Beerus (FB01-023), whose skill reads "Choose all of your opponent's Battle Cards with 25000 power or less and KO them." The skill has to choose, so it can't include the Barrier card.
Barrier is not total immunity, though, and the two gaps are worth knowing precisely. First, Barrier restricts skills, not attacks: it says nothing about combat, so a Barrier card that loses a battle is KO'd like any other card. Second, an opposing skill that resolves without choosing a card isn't restricted by Barrier at all — [Revenge] is the clean example, since its reminder text reads "When this card is attacked, KO the attacking card after the battle," which acts on the attacker as a defined referent rather than choosing it. Note that this only ever comes up when your Barrier card is the one attacking; Revenge is a defensive trigger on the card being attacked, not removal you can point at something.
Barrier cards can also be used when combo-ing from the Battle Area, which adds a layer of flexibility beyond pure defense — a Barrier card isn't just something that dodges removal, it's a card that can still contribute actively even while parked defensively on board.
Blocker: Redirecting Attacks
Blocker activates when an opponent declares an attack: you can rest (tap) a card with Blocker to change the attack's target to that card instead of whatever it was originally aimed at. This is the tool that lets you absorb a threatening attack with a card you're comfortable losing, rather than taking the hit directly or losing a more important piece of your board. (If you also play Gundam, note its Blocker keyword works differently — don't assume they're identical.)
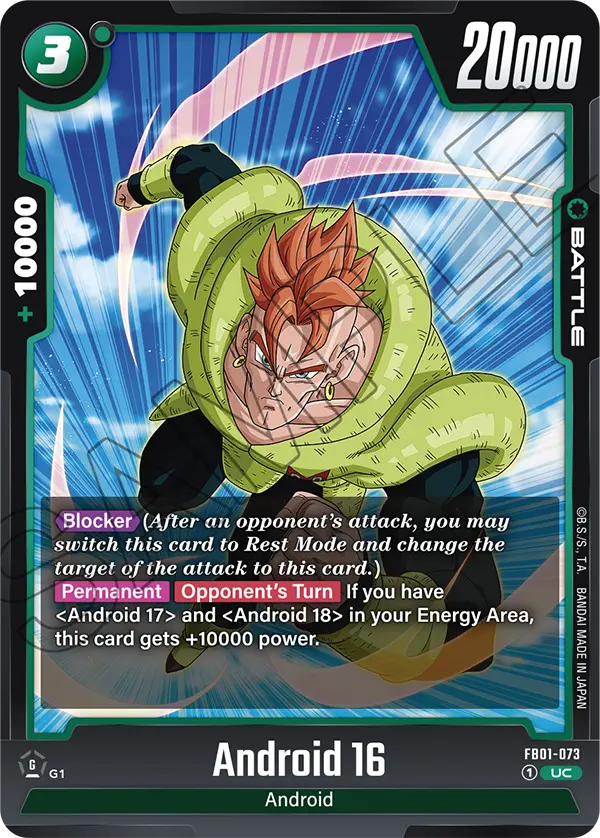
The tradeoff is real: using Blocker costs you that card's ability to act on your own following turns, since it's already rested. A Blocker deployed purely reactively, turn after turn, isn't contributing to your own offense — it's playing defense specifically at the cost of tempo and energy elsewhere.
Reading when to use a Blocker and when to just take a hit is a genuine skill test: absorbing a small attack with a valuable Blocker is often a worse trade than simply taking the damage and saving the Blocker for a bigger threat later in the same turn cycle.
One pattern worth internalizing is that Blocker becomes dramatically more valuable as the game approaches its closing turns. Early in the game, taking a hit to your Life area is relatively low-cost — you still have plenty of life left, and the card drawn from the Life area is a genuine resource gain. But in the late game, when you are down to one or two Life cards, a single unblocked attack can be lethal, and that is when Blocker's redirect ability shifts from a tempo tradeoff to an outright game-saving play. Players who hold their Blocker through the mid-game and deploy it at the critical moment consistently outperform those who burn it early on attacks that were not actually threatening.
Playing Around All Three at Once
A board that combines all three keywords creates layered defensive math: a Blocker can absorb your attack outright before Critical or Barrier ever become relevant to that specific exchange; a Barrier card that your removal is not allowed to choose changes what your follow-up turn actually looks like; and a Critical attacker on the opposing side punishes any attack of yours that gets through disproportionately compared to its raw stats.
Before committing to an attack or a removal effect, actively check for all three keywords on the opposing board rather than just the one you're most used to thinking about. Missing a Blocker because you were only watching for Barrier — or vice versa — is exactly the kind of mistake that costs games at a level where players actually know these keywords individually but haven't practiced reading a board with more than one in play.
A useful habit is to scan the opposing board in a fixed order every turn before committing to an action: check for Blocker first since it changes whether your attack connects at all, then Barrier since it changes what your removal is even allowed to choose, then Critical since it changes the cost of getting hit back. Building this into a consistent pre-action routine, rather than relying on memory in the moment, is what separates players who occasionally get caught out by a keyword interaction from those who never do.
Common Mistakes With Each Keyword
The most common Critical mistake is treating a Critical attacker like any other attacker of the same power level, without accounting for the extra Life-area cost of letting its attacks connect repeatedly. Barrier gets misplayed in both directions. Players under-rate it by filing it away as anti-board-wipe tech, then walk a single-target removal skill straight into it and waste the card — the printed text stops both equally. Players over-rate it by treating it as blanket protection and leaving a Barrier card parked in front of a bigger attacker, forgetting that Barrier restricts skills and does nothing at all about combat.
The most common Blocker mistake is using it defensively on every attack out of habit, rather than actively deciding whether the specific attack being blocked is actually worth spending a rested card to answer. Blocker is a tool, not a reflex — use it when the trade is genuinely favorable.
Rules Precision Matters Here
Barrier's exact wording is "This card can't be chosen by the skills of your opponent's cards." The load-bearing word is "chosen." If an opponent's skill has to choose a card to resolve — whether it chooses one target or every card in the Battle Area — it cannot choose the Barrier card. If a skill resolves without choosing anything, Barrier doesn't apply. And because Barrier restricts skills only, it has no bearing on ordinary combat: a Barrier card wins and loses battles on power like anything else.
Do This
- Check the board for all three keywords before committing attacks
- Bait Blockers with smaller attacks before swinging with Critical
- Prioritize removing Critical attackers — the Life denial compounds
- Save Blocker for attacks that actually threaten lethal or key cards
- Answer Barrier cards through combat — targeted skills can't choose them
Avoid This
- Treating Critical attackers like normal attackers of the same power
- Assuming Barrier only stops board wipes — it stops every opposing skill that chooses
- Using Blocker reflexively on every attack regardless of trade quality
- Ignoring that a Blocker is already rested and can't block again
- Spending targeted removal on a Barrier card that your skill can't legally choose
FAQ
- Does Barrier protect against a single-target removal effect too? Yes. The printed reminder text is "This card can't be chosen by the skills of your opponent's cards," which covers any opposing skill that has to choose a card — single-target removal every bit as much as a board-wide "choose all cards in the Battle Area" sweeper. What Barrier does not stop is combat, or an opposing skill that resolves without choosing a card at all.
- Can I use Blocker on an attack that isn't targeting my Leader? Blocker changes an attack's target to the Blocker card itself, which is useful for protecting your Leader or any other card an opponent's attack is aimed at, depending on the specific attack being declared.
- Is Critical worth playing around if my deck doesn't rely on Life-area draws? Yes — even decks that don't specifically build around Life-area triggers still lose real resources when Critical denies a card draw. The effect is relevant regardless of your own deck's specific strategy.
- Should I always block with a Barrier-carrying card since it's already protected? Not automatically — Barrier stops your opponent's skills from choosing the card, not attacks from killing it. A Barrier card can still lose a standard attack exchange and be KO'd, so evaluate each block on its own combat math rather than assuming Barrier makes a card safe in every situation.
Three Keywords, Three Different Questions.
Critical asks "what happens when this attack connects." Barrier asks "can my opponent's skills even choose this card." Blocker asks "who does this attack actually hit." Treating them as interchangeable defensive tools is exactly the mistake that leads to misreads at the table — each one demands its own specific sequencing response.
Check a board for all three before you commit to an attack, and you'll avoid the specific misplays that come from only tracking the keyword you're most comfortable with.
Keep Studying
- → The Combo System Explained
- → Closing Games vs Control in Fusion World
- → Beating Aggro in Fusion World: Anti-Red Tech
- → DBS Fusion World Strategy Hub (2026)
© GEEKYDOMAIN.COM | Strategy Powered by Data